SPLINTERS
Tennessee Valley Woodworkers
 Vol. 18/ Issue 1 January
2003 Editor: Tom Gillard
Jr.
Vol. 18/ Issue 1 January
2003 Editor: Tom Gillard
Jr. 

Meeting Notice:
The next meeting of the TN Valley Woodworkers
Will be held, January 21st, at 7:00 p.m. in the
Duck River Electric Building, Decherd, TN
All interested woodworkers are invited!
The following people have agreed to serve as contacts for their particular
skills. If you have questions, suggestions for activities, or other
comments relating to these skills, please call these folks. Their
interest is to help the club better serve their area of expertise.
Your participation with them will help them achieve that goal. Click
on name to contact them.
Design: Alice
Berry 454-3815
Finishing: Phil
Bishop
967-4626
Turning: Tom
Church 967-4460
Carving: Harry
May 962-0215
Sharpening:
Bob
Reese 728-7974
Joinery: Ross
Roepke 455-9140
Health and Safety:
Maurice
Ryan 962-1555
List of Club
Officers
President:
Doyle McConnell
V. President: Ken
Gould
Secretary:
Barbara Keen
Treasurer:
Henry Davis
Publicity:
Loyd Ackerman
Newsletter Editor Tom Gillard
Jr.
GOD BLESS AMERICA!

The Executive Committee had a meeting the first part of the month and
covered many items concerning the club and the upcoming year. Some
of these items are listed below.
---------------------------------------------------------------
THEMES FOR THE YEAR:
It was decided that first quarter could be tools, handling and
usage. Second quarter could be craftsmanship and materials with the 3rd
and 4th quarters being projects.
OTHER BUSINESS: Tom Cowan said he would like the club to get
back to the small workshops, where you make a specific project. He
will work on trying to get that going again. It was also discussed
that it would be nice to have tours of our member's shops. A tour
of a sawmill was also discussed. It was also mentioned that gold leaf could
also be a topic for a program. Tree identification was mentioned
as a suggestion for an outing where we could learn tree identification.
YEARLY DOOR PRIZE:
It was decided to purchase a Tormek
sharpening system.
CALENDAR OF EVENTS:
Spring Seminar: April 26th. Theme and place: TBA
Picnic: May 24th. Place TBA
Coffee County Fair: Sept 22-27.
Fall Seminar: Oct 18th. What and where, TBA
Christmas Party: Dec 12th.
WORKSHOPS: There are many items in the works. The only
item on the calendar at this time is a Turning Bee at Tom Cowans on July
6th. Ideas from the membership would be greatly appreciated.
We need input from the masses.
Financial Report for 2003: The club is in good shape going
into the New Year.
SHOW & TELL
It has been discussed for many months/years now about the best method
of doing show and tell. Some words we have heard are about folks
being intimidated because of the high quality of some of the items that
are brought in. These people think their work "isn't good enough".
Well, all the people that come into this club are your friends. We
have NEVER heard any negative comments about any item brought in by someone
just starting out. This is a place of learning. None of us
were born doing this type of work. There is a learning curve in anything
you do. This club helps smooth out this curve by being able to talk
out a problem you might be having. You get to ask questions and be
answers right away. No one has ever been stingy about helping out.
So, PLEASE bring in your work. We WANT to
see it!! As stated in a previous edition, many people have built
their good works on learning the mistakes that other have made. They
can jump over the rough spots and move on to another level of quality.
Thanks,
Tom
If anyone has information about a member that is sick or has been injured
and wants the club to know about it, please let me know so I can get it
in the paper
Thanks
Woodworking Glues
With all of the gluing products on the market
today, choosing the right type for your needs, and
using it correctly, can get tricky. For help, we
turned to the WOOD®
magazine staffers who
design and build the projects featured in our
publication: Jim Downing, Jan Svec, and Chuck
Hedlund. We'll tell you about the eight types they
rely on, and share their tips for using each
successfully.
First, choose the glue that's right for the job
The first time you glued two pieces of wood together, you probably
reached for your bottle of good o'' yellow woodworker's glue. It worked,
so
you stuck with it. But if you've ever wondered if there's a better glue
for a
particular job, check our What's What in Woodworking
Glue chart, and be
confident in your choice. Make a copy of this chart and post it near where
you store your glues, and you'll never again scratch your head over which
glue to use.
Our pros' best gluing tips
One sure way to gauge the expertise of a woodworker is to examine the
joints on his or her projects. Are they free of glue squeeze-out and
rock-solid, even after many years of use? If so, they probably learned
(the
hard way, in some cases) many of the tips we'll share here. You'll learn
how to use each of the eight glues in the chart, but because yellow, white,
and water-resistant glues are similar in the way you apply, work, and clamp
them, we'll discuss them together.
Woodworking Glues
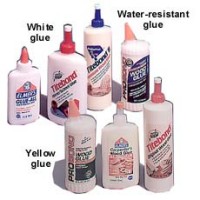
Yellow, white, and water-resistant
glues: the old standbys.
You probably use one or more of these
three similar glues more often than any
other typewith good reason. They are
versatile, easy-to-use, and affordable,
and they provide strong bonds. The next
time you reach for one of these glues,
consider trying the following tips:
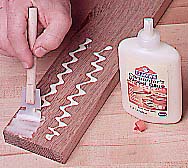
For the strongest bond, make sure your
pieces fit together well. Then cover
both
joining surfaces with a thin layer of
glue.
You can spread it with a brush, a paint
roller, orJim's favoritethe plastic
core of
a disposable foam paintbrush as shown.
Clamp with even pressure all along the
joint, but not too hard or you'll squeeze
all
the glue out and make a weak joint.
For small areas, mask the wood
adjacent to the joint with masking tape to
prevent the squeeze-out from getting on your
work. For longer joints,
remove the squeeze-out with a damp cloth while
it's still wet, "rolling" the
cloth as you go to keep from smearing the
excess glue on the adjacent
surfaces.
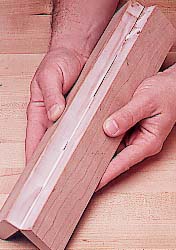
To minimize squeeze-out on the face side
To minimize squeeze-out on the face side
of your projects, Chuck suggests you bring
the two pieces together at a slight angle,
joining the face edges first, as shown at left.
As you lay the pieces flat to clamp them, most
of the squeeze-out will be on the back side.
Here are a couple of tips that apply only
to water-resistant glue:
It tends to separate, so mix it well before
each use.
Wear your shop apron when using
water-resistant glueit doesn't wash out of
clothing.
 Polyurethane
glue: the promising newcomer
Polyurethane
glue: the promising newcomer
Before this glue debuted on the market a few years ago, you had to mix
two components together to create a waterproof glue. Not any longer. For
your outdoor projects, give this glue a try, and you'll like it. Just keep
the
following points in mind:
This product needs a little moisture to make a strong bond. So
before
applying polyurethane glue to dry woods, wipe the area to be joined with
a
damp cloth.
After clamping, the squeeze-out will appear as a brownish foam.
Chuck
says, "Resist the temptation to wipe it off when it's wet, or you'll end
up with
a sticky mess." After this foam hardens, it can be cleaned up by slicing
it
off with a sharp chisel, bevel side down, working the edge across the joint.
Buy only as much as you'll use in a year because humidity can cause
this glue to prematurely turn to a useless gel. Extend the shelf life by
keeping the glue bottle closed as much as possible.
Why not hide glue?
Antique furniture restoration experts and some woodworking purists may
wonder why we don't use hide glue in our shop. Historical considerations
aside, hide glue's chief advantageits extremely long open timeis also
its chief disadvantage. Jan says, "We just never use it. White and yellow
glues allow enough open time for virtually any assembly you're likely to
run
across, and you won't need to wait overnight for every joint you clamp.
Also, unlike joints made with hide glue, joints made with these glues won't
weaken overtime."
"WOOD"
on-line
Guide
to Woodworking Glues
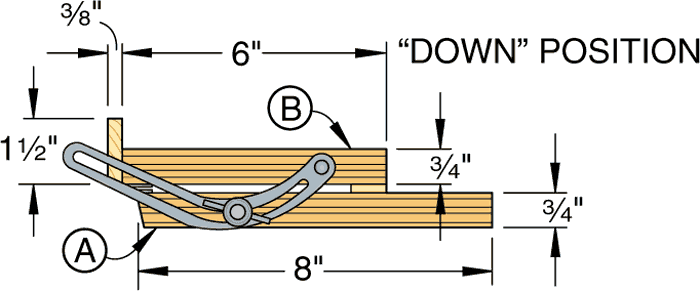
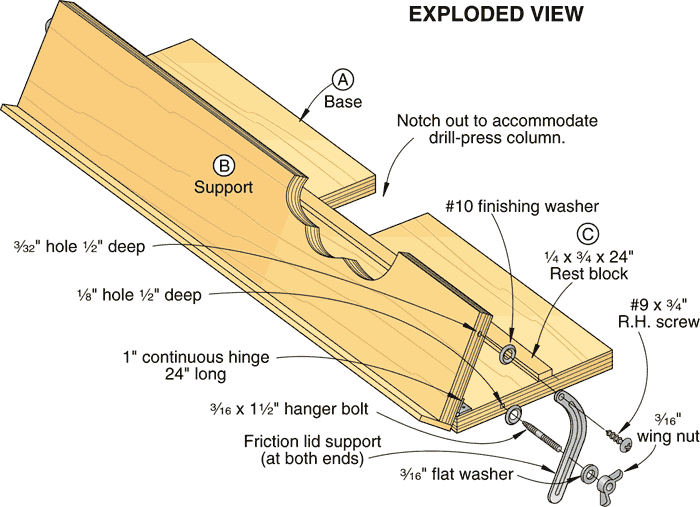
Adjustable Angle Jig
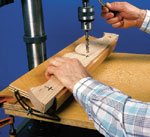 Build the jig as
shown and
Build the jig as
shown and
dimensioned on the drawings. The base (A) must
be longer than your drill-press table so the friction
lid supports (one at each end of the jig) clear the table
ends. Use a piano hinge to secure the adjustable
support (B) to the plywood base (A). A pair of
friction lid supports allow you to angle the support and lock it securely
in
position. The rest block (C) allows you to position the support parallel
to
the drill-press table.
To use the jig, loosen both wing nuts so the support can swivel freely.
Then, using a T-bevel or an adjustable triangle to set the required
angle
of the support to the drill bit, tighten the wing nuts to secure the
support in
place. Clamp the jig to your drill-press table. Drill a test hole to
verify the
angle. Once verified, drill the angled holes in your workpiece.

ANGLE UP
ANGLE DOWN
EXPLODED VIEW
FOR SALE
Craftsman 10 in. Table Saw $250.00
Craftsman Wood Shaper $175.00
14 Shaper Cutters $100.00
Central Machinery 8 in. grinder $75.00
Contact Henry Davis
or 393-3191
FOR SALE:
12 Sears Wood Turning Lathe.
36 between centers, ½ hp motor, 4 speeds;
Comes with the following items:
6 & 12 tool rest, 4 faceplate, table and a speed reduction
assembly.
$150.00
Contact Tom Gillard
(455-6651 or 393-0525)
FOR SALE
CarbaTec
Mini Lathe (Modified with new Electronics from Penn State)
(See page 46 in Penn State Industries catalog for comparison.)

Variable speed 400 to 4500 RPM
Comes with face plate, spur center, live centers, 3 and 6" tool rests,
pen mandrel and other extras.
$195
Call: Loyd Ackerman
OR 931-728-9952

WEB
SITES of INTEREST
Members sites:
Doyle
McConnell's page
Loyd
Ackerman's Page
Falls Mill
Russell Brown's Web Page
Geoff Roehm
Resource Sites:
American Association of Wood turners
WOOD
ONLINE newsletter
Scott
Phillips Video Help sessions
Arrowmont
School of Arts and Craft
Appalachian
Center for the Arts
Forest
Products Lab. 1999 Wood Handbook
Woodworker's
Journal
WOOD
Online TVWW page
Kevin's Woodturnings
The Oldham Company
The Woodworker's Choice


10 % OFF Fine Woodworking
Books from Taunton Press
We're open Monday thru Saturday
SEE YOU ON THE
21st!
Tom Gillard Jr.

 Vol. 18/ Issue 1 January
2003 Editor: Tom Gillard
Jr.
Vol. 18/ Issue 1 January
2003 Editor: Tom Gillard
Jr. 