SPLINTERS
Vol. 12/Issue 3 Tennessee Valley Woodworkers Editor; Tom Gillard March 1998
QUESTION: I’m getting ready to build a table. A woodworker friend told me when I glue up the top, I should alternate the orientation of the boards. Another told me it doesn’t matter which way I place the boards. Who’s right? Kevin Michaelson Lawrence, KS
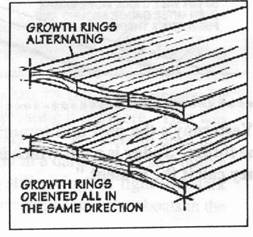
ANSWER: Actually, neither of your friends is wrong. They’re talking about orienting the boards so the growth rings visible in the end grain arc up on one board and down on the next, or all are consistently in the same direction.
If you alternate the boards, your panel should remain flat across its overall width, as each board cups in the opposite direction. But the panel surface may feel wavy.
On the other hand, if you glue-up the boards with the growth rings all oriented in the same direction, the whole panel may cup in one direction. The surface remains smooth to the touch, but the entire panel may take on an arched shape.
I pay attention to the growth ring patterns, and try to alternate every other board. But I pay more attention to each board’s face grain appearance. If I have to, I’ll orient adjacent boards with the growth rings pointing the same way in order to get the best looking panel.
Also, make sure you apply an equal number of finish coats on both sides of the table top. This helps keep any moisture absorption or loss equal on both sides, further reducing the likelihood of warping or cupping.
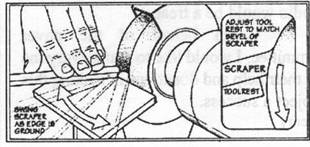
Sharpening a scraper is easy. The first thing you’ll need to do is set the tool rest to match the bevel angle on the scraper, see below.
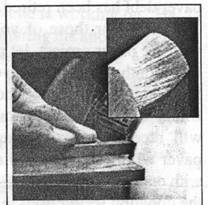
With the rest locked in place, creating the burr is just a matter of setting the scraper flat on the rest and sliding the cutting edge along the edge of the wheel, see photo. As you grind the scraper, a burr forms along the top edge, see inset photo.
For curved edges, the technique is a little different. To avoid grinding a flat spot, you’ll need to swing the handle to the side as you move the cutting edge across the edge of the wheel, see drawing.
NEXT CLUB MEETING:
17-MARCH-98
Duck River Utility Bld.
Decherd, TN
7:00PM-9:00pm
This issue has a few tips and techniques in it. These came from the Wood Shop Web Page. I hope some of them will come in handy.
A WORD FROM THE TREASURER
Due to the success of our” not so silent” auction at our February meeting I’m happy to report that our Arrowmont paver debt has been retired.
For those of you not familiar with the paver project, let me explain. A few months ago the club voted to donate $500.00 to Arrowmont School of Arts and Crafts in Gatlinburg. For our donation we will receive a recognition paver. The paver will be an 8” x 8” limestone block with our club’s name on it-- The-funds for the donation were raised in various ways, and after we had raised about $450.00 we voted to “borrow” the rest from the club treasury with the understanding we would continue the fund raising effort.
The silent auction raised $90.50, this was enough to pay the balance of the paver fund and have some left over to put into the club treasury.
The paver will be installed soon in the ‘Woodworker’s Walk” at the new Wood Studio at Arrowmont. When you are in Gatinburg a visit to the Wood Studio would be a treat.
On behalf of the paver committee, I would like to thank everyone for their help and donations in making this project a success.
Henry
Crosscutting wide boards on my table saw has always been a challenge. The pieces are awkward to handle, and it’s hard to control my miter gauge when its head is off the table. I know some saws have a T-slot in the table and a miter gauge bar with a plate that catches in the slot. But mine isn’t equipped this way.
That makes it difficult to hold everything and guide the board. I’ve had cuts come out crooked, and I got concerned that the blade might bind in the kerf, causing the board to kick back.
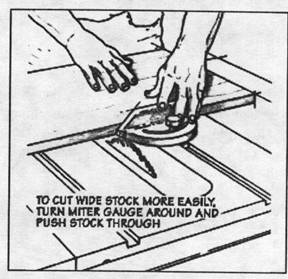
To make cutting wide boards easier, I turn my miter gauge around, so the miter gauge head is in front of my board, instead of behind. I hold the work piece snug against the gauge with my left hand, and use my right to push the work piece through.
On some boards, the miter gauge head may be off the saw table when you complete your cut, so make sure you keep a-firm-grip-on the gauge.
“Yesterday’s the past and tomorrow’s the future. Today is a gift which is why they call it the present.”
The TN Valley Woodworkers:
Tom Cowan:
• At 10 years old (about 45 years ago) Tom got an electric jig saw. He made a wall shelf for his Mom. From this point his interest and skills developed and grew. His high school experiences included industrial arts. He enjoys all the projects he works on. Turning is the main focus at the moment. He hopes to continue to pass his knowledge along to others. He wants others to enjoy working with their hands and feeling the satisfaction of creating something made of wood.
Henry Davis:
Henry started his woodworking career as a child (44 years ago) with a hammer and nails but feels the real calling
came as a sophomore in high school. He also had a long, line of woodworking relatives.(many uncles). His first project was a cherry magazine rack, which was made in the high school shop class. He still has it. He enjoys making gift items for family and friends. He is also interested in construction and repair of furniture and in turning. He hopes to have as much fun woodworking in the future as he is having right now. He hopes he can share that fun with others.
Tom Gillard:
I got involved in wood working through my grandfather. He gave me his table saw when he felt it was unsafe for him to be operating it anymore. That was about 15 years ago. We were in need of a hanging light in a dark corner, so I built a lamp. It is still giving off light in a dark corner. I have built some river boats in the past and they were a lot of fun. It was a different use for wood. I hope to be able to have fun woodworking and pass along any knowledge I might have to offer to others. Roy Underhill was also a big influence on me.
Steve Graham:
Steve started off about 2 years ago with a hanging relief carving. This project then lead to a ‘honey do’ for his wife. She was in need of a foot stool. He set about making one that had some relief carving in
it. Steve enjoys the feel, challenge, and beauty of the wood he is working on. He is interested in furthering his knowledge in all aspects of woodworking. He would like to share his knowledge of carving with other.
Next Meeting:
Ever wanted to know how to cut “handcut” dovetails? This is your chance. Tom Cowan will demonstrate the techniques for this very strong and nice looking joint. Please attend and try putting this type of joint into your next project.
** * * * ****** ***** **********