
Vol.11 / Issue 10 Tennessee Valley Woodworkers Editor, Richard Gulley October 1996
CATCH UP
It’s been a busy time for woodworkers since our last meeting. From all reports, it seems Fall’s Mill was a success as usual. The picnic held at the Duck River Electric ‘park’ was mah-va-lous. The weather was agreeable (maybe a little cool) and the meal was great. Watch for other comments on both of these events later in this issue.
FROM YOUR PRESIDENT
To Tenn. Valley Woodworkers
Following the September meeting, several of us were visiting when Tom Cowan suggested a club project that I will present for your consideration and discussion at the next meeting. Some of the concepts for the project are presented here, but all are subject to change or improvement.
Members interested would build a piece of "furniture" for showing at selected locations in our area. Some goals of the project would be to improve the quality of our workmanship, challenge us to undertake new techniques, and to obtain publicity for the club. The consensus was to limit the effort to building "furniture" initially. If this is succeeds, subsequent efforts might be accessories, instruments, tools or crafts.
With the onset of cool weather, the effort should start soon with showings in the spring. This would provide about six months for selecting the design and completing the project. Areas for further discussion include :
‚
Is this a good idea?‚
Who will participate?‚
What is "furniture"‚
Should the project be juried or critiqued?‚
Should there be a design review process?‚
Other concerns, problems, issues.We need good participation to make this project a success. If you cannot attend the next meeting, please call me (455-8310).
The magazine American Woodworker has a competition for the design of a better workbench. The winning entry will get the club $1000 plus national exposure. If anyone is interested in participating, please contact me.
Thanks,
Ross Roepke
Ten Years Ago This Month
Toys for Tots was on the October 86 agenda along with three decent plans for a farm tractor, a ‘grasshopper’, and a simple tractor trailer rig. See me if you’re interested in a copy of those plans.
NEWS FROM FALL’S MILL
I received this note from the Lovett’s. - Dear Club Members,
Many thanks to the club members who braved the weather and helped make our artisan day a success.
In spite of the cold and rain we had a great time. Those interested visitors who came out in the afternoon were very impressed with your talent and workmanship. We appreciate you all!
Janie & John
More From Ross
The auction at the annual picnic earned the club $127.50. We want to thank Mrs. Bishop for acting as the teller for the auction and Richard for playing auctioneer.
We planned for 60 to attend the picnic; 36 attended. It was a cool evening but pleasant. Thanks, Tom, for arranging the picnic area for us. For the record, we ate about 7 pounds of bar-be-que, and lots of good food. Thanks to all the good cooks - everything was delicious. Total net cost was $86.50. There was lots of residuals we’ll save for next year. I bought back 3 pounds of bbq.
All seemed to have a great time. The only complaints I heard were that the ladies were cold and the auction lasted too long. As with all auctions we had lots of reluctant bidders.
Ross Roepke
NEWS FROM THE NET
I know you’ve been anxiously waiting to see what I’ve mined out of the Internet goldmine this month. Since our last month’s program was on finishing, I thought you might like some finishing tips. So here goes:
Stripping Antiques
If you get hold of an antique with its original finish you may not have to use expensive varnish stripper. Factory made pieces were (and are) almost never finished with varnish, as shellac and lacquer are preferred finishes. To test the piece and remove the finish, you will need a can of denatured alcohol (shellac thinner) and a can of lacquer thinner. First, apply a small amount of denatured alcohol on a rag to the finish, if it dissolves, it is shellac. If it doesn't then try a little lacquer thinner, if the finish dissolves it is lacquer. If this doesn't work it's probably varnish. Denatured alcohol only dissolves shellac, but lacquer thinner will dissolve both shellac and lacquer. This is why you try the denatured alcohol first, if lacquer thinner was used first and worked, it would only prove the finish to be either lacquer or shellac.
If the finish is lacquer, you should use straight lacquer thinner with 0000 steel wool, or synthetic steel wool. If the finish is shellac, it is recommended to use 3 parts denatured alcohol with one part lacquer thinner. Again, use 0000 steel wool or synthetic, you will notice that you can either take all of the finish off or just clean the finish by rubbing more lightly. Shellac has been used for centuries as a sealer coat as well as a finish coat. Be forewarned, however, that once opened a can of prepared shellac has a short shelf life. It is better to buy shellac flakes and mix them with denatured alcohol only in the quantity needed for the project. The flakes will keep indefinitely.
Walnut Stain _ From Walnuts!
A really nice walnut stain can be made from the husks of walnut. Simply place them in a jar and cover with household ammonia for a few days. When the ammonia has gotten quite dark, strain the liquid through some cloth into a wide mouthed jar. The resulting stain has been used by furniture makers for centuries.
Roofing Tar _ Finisher's Best Friend?
So you think roofing tar is only for roofs? That is only one of the uses for this miracle product! 'Asphaltum' has been used for many years as a stain and glaze. It may be hard to find a can labeled 'Asphaltum', but roofing tar is all over the place. Thin with mineral spirits to make a liquid and apply to raw wood to get a wonderful, rich, brown/black, mission oak stain (especially on white oak). Experiment with various consistencies and wood types. It can also be used as a glaze between finish coats. Finish with a coat of varnish (or Royal Finish) _ you'll like it!
Ammonia Fuming _ A lost art?
The Arts and Crafts style of furniture incorporated two things that aren't seen very often these days: quartersawn white oak and ammonia fuming! The arcane craft of ammonia fuming is really not a difficult process, as you simply place your assembled and sanded furniture piece (less any metal fittings) with a wide mouthed jar of ammonia in an airtight container. The reason for the airtight container is obvious if you have ever smelled industrial strength ammonia! The best place to do this is outside or in an area that is not inhabited! Ammonia fumes will turn brass black! Remove any metal fittings before fuming!
Ammonia fumes react with the tannic acid present in oak (also chestnut and mahogany) and will turn your wood a shade of brown that becomes darker as time in the fumes increases. You can use household ammonia, but it works quite slowly. We have had success with blueprinter's ammonia. If you can't find a supply, call a blueprint firm or someone who makes microfilm copies (microfiche) and ask where you can get it. We paid about $6.00 per gallon for it here, but you don't need much at a time.
Smaller articles can be placed in a plastic bucket or trash can and covered with a plastic garbage bag using a large rubber band to seal the top. You can also build a framework of 1 x 2's (for larger pieces), cover this with plastic sheeting and seal with tape. Another alternative is to build a chipboard box and seal the joints with silicone glue. If you put a glass or Plexiglas window in the box you can see how the darkness of your piece is progressing.
Avoid exposing your piece to sunlight during fuming as this may affect color. Cover windows or plastic tent with a blanket.
We recently fumed a quartersawn white oak clock by placing it in a five gallon plastic pail with a garbage bag over the top, sealed it with a rubber band and exposed for about 4_1/2 hours to the fumes of blueprinter's ammonia.
TIP: take one quartersawn white oak board and cut it into 9 to 12 small pieces. Keep one piece out and mark it as 0 hours. Place the rest of the pieces in the fuming box and remove one piece every hour and write number of hours it was exposed to the fumes. After all the samples have been fumed, you will have an index to darkness of fuming vs time in fumes which can be used for future furniture projects.
And how about this little tidbit of wood knowledge -
Red & White Oak
So what's the difference between the various oaks? Seems like a simple question, but the answer is a little more complex. Oak sold in the United States belongs to the biological genus 'Quercus' which consists of quite a few different species. The lumber trade generally separates oak into two varieties: "Red Oak" and "White Oak". White oak is not actually white but rather light tan to light brown in color and not generally uniform in color. When quartersawn, white oak can have a pronounced flake pattern. White oak is a relatively waterproof wood and has been used for centuries for making aging barrels for whiskey and sills for housing. It is resistant to rot and decay due to the pores of the heartwood being filled with mineral deposits known as 'tyloses'. Because of its strength and resistance to decay, many sailing ship parts were made of white oak (i.e. the sides of 'Old Ironsides', the USS Constitution). The wood is fine textured and the annual rings are quite compact. The acorns of white oak mature in one season and the trees are recognized by the presence of rounded lobes on the leaves. Bur oak is one variety of white oak.
Red oak is named due to the reddish color of the heartwood which also produces a pleasing pattern when quartersawn. Generally the wood does not have as tight a grain as white oak, and since there are few tyloses, it is not water resistant and a poor choice for barrels. Red oak is more uniform in color than white and has larger and looser knots. The sapwood is lighter and contrasts greatly with the heartwood. The acorns of red oak mature in two seasons and the lobes of the leaves have a bristle tip.
A Few Witty Sayings
Fill what is empty.
Empty what is full.
Scratch where it itches.
-----------
Never try to teach a pig to sing. It frustrates you and irritates the pig.
--------------
"Any man who strives to do his best whether his work be great or small is considered to be doing the work of a lion." ___ nagarjuna © 100 _200 AD)
------------
If you aren't confused, you aren't paying attention.
------------
PLANING END GRAIN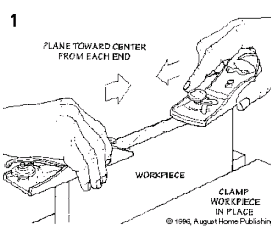
Planing end grain presents a special problem. When a plane blade passes over the end of a workpiece, it can dig in and cause the end to break or chip off.
There are, however, a couple of ways to prevent this.
PLANE TOWARD CENTER. One simple method is to plane from either end toward the center, see Fig. 1. This avoids the problem by not allowing the blade to catch on the unsupported ends of the workpiece. The only problem with doing this is it can be difficult to plane a straight edge that's both smooth and flat.
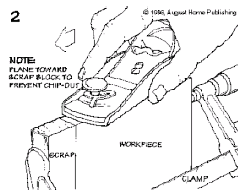
ADD SUPPORT. Here's a better solution. Clamp a scrap piece of wood to the end of the workpiece, see Fig. 2. This way, as you plane toward the scrap piece, the scrap piece supports the end fibers of the workpiece so they don't break or chip off.
Well folks, I think that about wraps up another issue of SPLINTERS. If there’s anything you would like to see in your newsletter let me know and I’ll try to accommodate. I’d also appreciate any of your own articles to include here. (I’d really appreciate them if you give them to me on a floppy disk).
You’ll also find a membership list in this issue. If you’re not on the list and think you should be, give Henry or Judy Davis a call.
In case you haven’t heard, one of our members, Jean Ackerman, passed away very recently. Our sincere regrets and prayers go out to Loyd and family.